Hiking the Second Tallest Waterfall in Iceland: A Guide to Glymur Waterfall
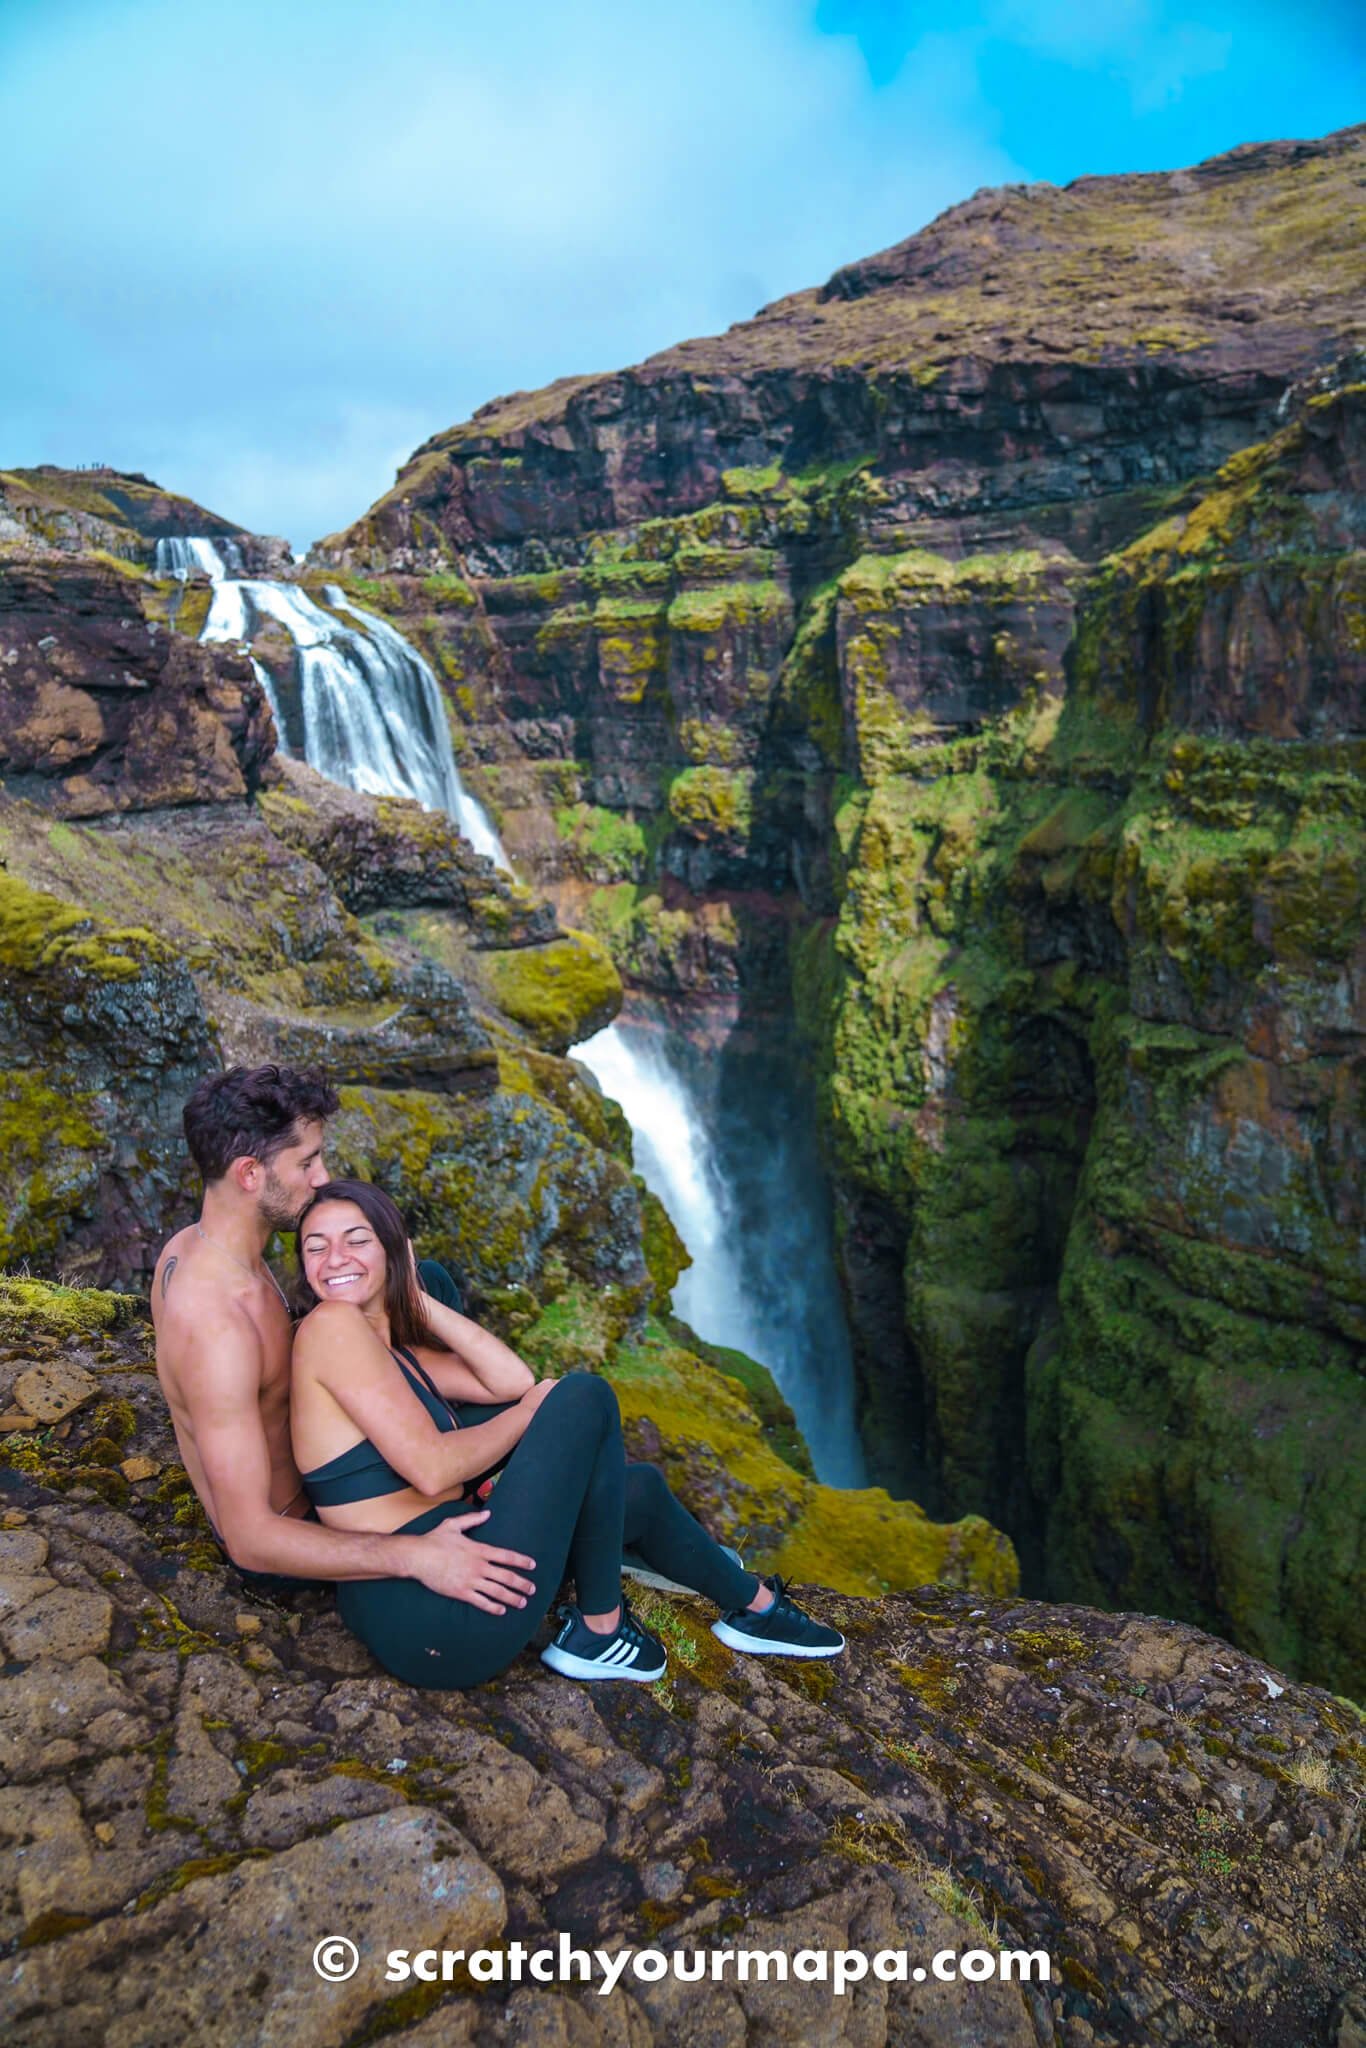
There are a ton of amazing waterfalls in Iceland, and Glymur waterfall was definitely one of the most impressive of them all.
It's actually the second tallest waterfall in Iceland, and despite its close proximity to Reykjavik, it still remains a bit under the radar for how impressive it is.
In this guide we're going to go over all of the details for hiking waterfall in Iceland, so that you can have a epic experience at one of the coolest waterfalls in the country.
*Please note that this blog post may contain some affiliate links, which we make a small profit on, at zero cost to you. Links are only used on products & services that we've used and believe in, to give you the best buying experience. Purchasing from these links helps us to continue providing free travel guides for you- so thank you for your support!
Our Travel Planning Recommendations
 Skyscanner (flights)
 Booking.com (hotels)
🎫 Get Your Guide (tours)
 Ticket Master (events)
📸 Best Buy (equipment)
🚗 Rental Cars (car rentals)
 Train Line (train tickets)
 Bus Bud (bus tickets)
 Direct Ferries (ferries)
 Cruise Direct (cruises)


📍 Where is Glymur Waterfall in Iceland?
Glymur waterfall is located in Hvalfjarðarsveit, Vesturland, about 70 km north east of Reykjavik.
How Do I Get to Glymur Waterfall?
Glymur waterfall can be reached by hiking. The trailhead is only reachable by driving, so we highly recommend renting a car while in Iceland. If you don't have a car, another option is to take this tour to Glymur waterfall from Reykjavik.
⏳ How Long Does Glymur Waterfall Trail Take?
There are a few different trails to be able to see Glymur Waterfall, and each one takes a different amount of time.
The quickest/easiest trail takes about 1- 1/2 hours round trip, while the more difficult trails take around 3 hours round trip. If you'd like to experience both sides of the canyon, then you'll want to set apart 5-6 hours for the entire thing.
🥵 How Difficult is the Glymur Waterfall Hike?
Hiking Glymur Waterfall can either be very easy, or pretty challenging, depending on which trail you decide to take.
The hike on the left side of Glymur wasn't that difficult, but there were areas where we got a bit lost doing the fjord trail due to lack of signage or people around. The easiest trail on this side can pretty much be done by all ages and hiking levels as it's pretty flat and straight,
The right side of the canyon is much more difficult, and requires proper hiking gear. This is a much steeper area, and can also be very muddy and slippery. (Don't worry- we'll explain more about each of the trails in the next section).
The Hike to Hengifoss Waterfall
Now that you know where Hengifoss waterfall is, let's dive into the hike to get there.
Don't have time to read the whole article and want to save it for later? Just pin it!


Step 1: Read the Signs at the Start of the Trailhead
When you first get to Glymur waterfall, it's important to read the signs, so that you can be reminded of all of the safety precautions, as well as choose which route you'd like to take.
We didn't realize just how confusing the area was until we arrived, as the rest of the waterfalls in Iceland that we visited had one simple trail. Glymur waterfall is a bit different though.


Step 2: Choose Your Viewpoint
There are two different viewpoints that you can choose from, and 2 different ways to get to each.
The easier viewpoint (and the one that is more accessible year round) is the route that goes on the left side of the canyon, while the more direct (and supposedly more impressive) view is on the right side of the canyon.
Due to the weather conditions and just having regular sneakers, we opted for the left side of the canyon, which is the one we are going to go in more detail about.


Step 3: Choose Your Trail
There are actually two different trails that you can take on the left side, and two on the right side.
Trail 1: The easy path on the left side of the canyon (Svartihryggur)
This trail is the most accessible route, and is the one that we took on the way down from Glymur waterfall. It's the least scenic route, but the easiest one to take as it slowly goes up and around to the top where Glymur Waterfall starts.
This trail is 3.5 km, and took us around a half hour at a fairly quick pace going down. We'd estimate it probably takes 35-45 minutes going up.


This trail is very easy, and not too steep.
Trail 2: The more difficult path on the left side of the canyon
This is the trail that we took up the canyon, as it is the much more scenic route. Rather than going around to the top, you'll be stopping at a cave, and walking up the edge of the canyon, with beautiful views the entire way.
It's a bit harder, but definitely worth the great views in our opinion. (Alternatively, you could come down this way). It's also 3 1/2 km, but took us an half and a hour (20 minutes being stops for photos).


This trail has great views and a cave along the way.
Trail 3: The path that crosses the river on the right side of the canyon
This trail is only open in the summer, and is completely dependent on the weather for safety reasons.
In the summer there is a log that allows you to cross the river safely, and then goes up the river on the right, which has some of the best views of Glymur Waterfall (from what we've heard).
We've also heard about some people crossing the river without the log, but heard it's extremely cold and dangerous, so not something we'd advise doing. In total, this hike should be about 3 hours round trip.
Trail 4: The super steep path on the right side of the canyon that doesn't cross the river
At first we were pretty determined to go on the right side of the river for the incredible views of Glymur waterfall. However, after speaking with other hikers who had just done this trail, we opted to save it for another time.
Rather than crossing the river, you just continue going up a very steep path, and then crossing over to the viewpoint on the right. It's longer and more intense, but will get you there with some really cool views.
It had rained a lot before we got there, and due to the uneven terrain and mud it just wasn't safe for us to do this. But if it's dry out and you have proper hiking boots, this may be a cool way to experience the epic views of Glymur waterfall from the right side!

Want To Learn How To Get Paid To Travel?
We'll teach you everything you need.
Hiking Glymur Waterfall on the Left Side of the Canyon
Right after the signs you'll follow the signs to Glymur, staying to your right hand side. The path starts off very simple and flat.


You'll walk for about 20 minutes, and then you'll arrive to the sign below:

The cave is located just below. Before going down though, we definitely suggest walking over to that big rock to take in the views of the river below!


After checking out the viewpoint, you'll walk down to find the cave below!


Walk through the cave and continue another 10-15 minutes, and you'll come across this incredible viewpoint of the canyon.


After this we honestly got a bit lost, and may have taken the wrong turn somewhere. However, we simply headed uphill and found the other river flowing down, leading into the main canyon where Glymur Waterfall is.
Make sure to look out for any signs you can, as well as rock towers, which are an indication that you are going in the right direction.


We kept climbing up with the stream of water on our right, and after 20-30 minutes we reached the Ridgeline of the canyon! It is simply breathtaking, and not going to lie- a bit scary. Make sure to stay away from the edge, as it certainly isn't guaranteed to be super safe.

You'll start to see Glymur waterfall peaking out, and the closer you get to the edge the more you'll be able to see it. Our legs were pretty shaky though, so make sure to enjoy it from a safe and flat platform!


We also flew our drone here, which was really cool! Be super careful though, as when we went it was really windy, and there were a ton of birds. Also make sure not to fly too close to the waterfall, as it could end up sinking your drone.


As soon as we finished enjoying the viewpoint we stopped at, we walked just another few minutes up to the very top, to see where the river flows into the waterfall. From there, we then started our hike down the easy trail.


The top is certainly not as exciting as seeing Glymur waterfall itself, but the views around it are very beautiful.

Glymur Waterfall Amenities
Just like most waterfalls in Iceland, there really aren't any amenities around Glymur waterfall. The path itself is very natural, and you won't find any bathrooms or restaurants on site. There is a parking lot though at the trailhead that is open and free to use.
When we were there we didn't see any bathrooms, food, or anything. We highly suggest bringing plenty of water and a sandwich or snacks to bring along the way.
The closest restaurant is 30 minutes away, and the closest supermarket is about 40 minutes away, so you'll probably be better off stopping in Reykjavik before heading to Glymur Waterfall.

Will You Buy Us A Coffee? ☕
As coffee lovers, we always enjoy the energy of caffeine. It helps us get the best free travel guides out there for you! 😄
Price & Timetable for Visiting Glymur Waterfall, Iceland
The trail for Glymur Waterfall is open 24/7, and is completely free of charge to visit.

How To Travel Cheaper and Better in 15 minutes!
How much more would you travel, if it costed you less resources?
With our Free eBook, you will learn how to save money and time on your future trips. Plus, you'll see the exact system we use.
Grab your copy for free when you sign up for our newsletter 👇

Safety at Glymur Waterfall
The hike to Glymur waterfall isn't very well marked, and it can be a bit dangerous. Do keep in mind that depending on the amount of rainfall can really make a difference on the hiking trail.
The canyon does not have any boundaries, and the cliffs are high and steep. Please do not get too close to the edge, and watch your step at all times!


Finally, keep in mind that the trail on the right side of the canyon is extremely steep and slippery, so unless you have the proper footwear (or if the log is available) please don't attempt this part.
We spoke with many other hikers coming back, and they talked us out of doing it because it wasn't safe enough with the sneakers we had, or the state of the trail.

Transform your photos
One click is all it takes to make your photos look stunning. Get our latest package of Lightroom presets, Into The Wild.
Other Things to Keep in Mind for Hiking Glymur Waterfall in Iceland
Now you know almost everything you need to know for hiking Glymur waterfall in Iceland. Don't go anywhere though! We have a few final details about visiting to share with you.
☀️ Weather Conditions at Hengifoss
The weather can be really unpredictable in Iceland, even in the summertime! We visited in June, and it was extremely windy and cold at times, and sunny and mildly warm at others.
Due to the unpredictability and quick changes it's important to be well prepared before embarking on your hike to Glymur waterfall.
📆 The Best Time to Hike Hengifoss Waterfall
The best time of year to hike Glymur is in the summer. This is the safest time to go, and when the canyon is at its greenest. Also, to be able to cross the river you'll need to go in the summer, as it's the only time that the log is in place and you can safely cross. We visited in the beginning on June, and it was still not prepared to cross yet.
The best time of the day to hike Glymur Waterfall is during the daytime, as this is when more people will be around. The area is huge, and it can be easy to get lost.
We only saw about 10 people the entire time we were there, and we went around 2 pm.


🎒 How to Prepare for Hiking Glymur Waterfall in Iceland
Here are some of the things we suggest bringing on your hike to Glymur Waterfall:
- Reusable Water Bottle (we use this water bottle from Cafago because it holds the temperature)
- Good Hiking Boots or Sneakers
- Water Shoes or Flip Flops in case it's very wet (we personally always get Havaiana flip flops, as they are comfy and long lasting)
- Poncho or umbrella in case it rains
- Windbreaker jacket
- Drone (We use the Mavic Mini 4 Pro because it's super light and has amazing quality)
- Camera (we use the Sony A7Riii)
- Standard Lens for a dynamic range (we use the Sony GM 24-70)
- Wide Lens to capture great panoramas of the canyon (we use the Sony GM 14 F1.8)
- Tripod to get pictures while no one is around or for stable long exposure shots (We use the Rangepod Tripod)
- Action Camera (we use the Insta 360 X3 because it's small & waterproof)

Looking To Travel Somewhere?
Off The Beaten Trips is our travel agency.
But this isn't anything like you've ever experienced before. You'll have an epic trip without having to break the piggy bank.
Unique locations. Epic adventures. Lifetime memories.
🤔 Is Glymur Waterfall Worth it?
In our opinion, we thought Glymur Waterfall was worth it! There is no explanation that can describe just how breathtakingly beautiful the canyon was. We definitely hope to make it back so that we can experience the other side of the canyon for the other viewpoint of Glymur.
The experience was incredible, but getting up close to the canyon to see the waterfall wasn't for the faint of heart though. The wind made it a bit scarier, especially since there are no boundaries, so this is a hike we'd recommend more for those that are not afraid of heights.
If you're not a confident hiker, you may want to skip this one, but there are a ton of amazing waterfalls in Iceland that you can check out!


Glymur waterfall is one of the most impressive waters in Iceland.
Tips for Hiking to Glymur Waterfall
- Stay far from the edge, and beware of rocks falling.
- Bring a waterproof poncho and an umbrella if it's cloudy out.
- Wear good hiking boots, preferably that are waterproof.
- Bring something heavy to put on your tripod to keep the wind from blowing it over.
- If you have a drone, fly it high before flying it over the canyon. (We use the Mavic Mini 4 Pro as it can zoom in and we don't have to bring it too close to the water.)
- Bring an action camera (we use the Insta 360 X3 because it's small & waterproof. Also you can use the extra long selfie stick for drone-like shots).
- Bring plenty of water and some snacks.


Travel Planning Tools
Here are some useful tools that you can use for planning your upcoming trip!
There are so many incredible waterfalls in this country, so to see more of them, make sure to head to our guide of the best waterfalls in Iceland.
Want to learn more about the amazing things to do around Iceland? Well, we have a ton of fun Iceland travel guides coming up, so make sure to subscribe to our newsletter for the latest updates, as well as receive exclusive content and discounts on our products and services.
Looking to build an epic Iceland itinerary? Look no further! Scratch Your Mapa offers the ultimate travel planning services, guaranteeing to save you both time and money for your Iceland trip. We don't only work to get you the best rates, but also to find you the most unique experiences. Simply send us an email to get started today!

Here are some other articles you'll love:
Like this article? Please share it with your family and friends, so that we can continue to keep creating free travel guides for you! It takes just a second, and would mean the world to us. Thanks for being here!