Hiking Trolltunga: The Most Iconic Spot in Norway
Are you looking to experience one of the most iconic places in Norway? Well, then hiking Trolltunga is definitely something that you'll want to add to your bucket list. This unique rock jutting out over the fjords has stirred the internet the past few years with its wildly breathtaking views, and terrifying photo ops.
After hiking all around the Lofoten Islands, we figured we would just look up where it is, and how long the hike to Trolltunga is. Little did we know that there is actually a ton to know in order to visit! As one of the most sought after activities in the country, this isn't some quick (or cheap) activity to throw into your schedule, but requires a bit of planning and power on your part.
We didn't find so much helpful information across the Internet, and were quite shocked by things when we arrived. That's why we decided to provide you a complete guide for hiking Trolltunga, so that you can be fully prepared to experience Norway's most epic viewpoint.
*Please note that this blog post may contain some affiliate links, which we make a small profit on, at zero cost to you. Links are only used on products & services that we've used and believe in, to give you the best buying experience. Purchasing from these links helps us to continue providing free travel guides for you- so thank you for your support!
Our Travel Planning Recommendations
 Skyscanner (flights)
 Booking.com (hotels)
🎫 Get Your Guide (tours)
 Ticket Master (events)
📸 Best Buy (equipment)
🚗 Rental Cars (car rentals)
 Train Line (train tickets)
 Bus Bud (bus tickets)
 Direct Ferries (ferries)
 Cruise Direct (cruises)


A Little Intro to Trolltunga, Norway
Before talking about the hike to Trolltunga, we want to explain a few things about this unique landscape.
🤔 Why is it Called Trolltunga?
Trolltunga in Norwegian translates to the "Troll's Tongue". The reason for this name is believed to originate from an old tale.
The tale said that a cocky troll believed that he wouldn't turn to stone when the sun shined on him. The troll would mock the sun by sticking his tongue out, which is where the unique formation of Trolltunga was thought to come from.

Trolltunga is in the shape of a troll's tongue.
📍 Where is Trolltunga?
Trolltunga sits above Lake Ringedalsvatnet, which is located in southern Norway.
🏘 What is the Closest City to Trolltunga?
The closest city to Trolltunga is Odda, which is in Hardanger. It is about 11 miles (17 km) west of the trail for hiking Trolltunga.
✈️ What is the Closest Airport to Trolltunga?
While Odda is the closest city to Trolltunga, there is no airport in Odda. The closest airport to Trolltunga is Haugesund (HAU), which is 156 km away, and takes around 3 hours in car to get to Trolltunga.
The next closest option is Bergen, which is a much more common airport to fly into. Bergen is located 160 km away, and takes about 3 1/2 hours to drive to Trolltunga.
The next biggest airport in the area is Stavanger, which is 217 km, and takes 4 1/2 hours to drive to. Finally, if flights tend to be too expensive, you could opt to fly straight to Oslo, and then rent a car there, which is exactly what we did (we made a whole road trip out of it).

Trolltunga is located in southern Norway.
How to Get to the Trolltunga Hike
The first step to getting you to the Trolltunga hike, is deciding which airport that you are going to fly into. The different airports that you can choose from are Haugesund, Bergen, Stavanger, and Oslo.
So how do you choose exactly which route to take? The answer really lies within your other plans for your trip. We decided to road trip southern Norway for a full week, so flew in Oslo, and decided to rent a car from the Oslo airport.
Keep in mind that there are two airports in Oslo, and one of them is very far! So check the airport before booking your rental.
Stavanger and Bergen are both beautiful cities with a ton of other great things to do around the area, so our suggestion is to check which airport is the cheapest to fly into (or which one works better with their flight times).
Flight Tip: Using Skyscanner you can put from "your city" to "Norway". This way you can see which is the cheapest airport in the area to fly to. Also, you can check the calendar to see which are the cheapest dates for each place!
Search for a flight to an airport near Trolltunga:
How Do I Get From Bergen to Trolltunga?
If you happen to fly into Bergen, you can either rent a car, or you can take the bus 930 from the Bergen bus station to Odda.
How Do I Get From Stavanger to Trolltunga?
In order to get to Trolltunga from Stavanger you can either take a ferry, and then a bus, or rent a car. We honestly think renting a car from Stavanger to Trolltunga is a better option, as taking the ferry and bus can add up to over 6 hours.
If you do want to go by public transportation though, you'll have to take a bus to Mortavika, and then get the ferry from Arsvagen. From Arsvagen you will then have to take a bus to Odda.
🚗 Can I Drive Up to Trolltunga?
You cannot drive up to Trolltunga. The only way to get there is by hiking Trolltunga.
There are four different options for getting to the trail head, so it can be quite confusing!
🅿️ Parking at Trolltunga
There are various options with different parking lots, and shuttles that you can take. Here is the breakdown for parking at Trolltunga.
Parking at P3
P3 is the closest that you can get to the trail of hiking Trolltunga, and definitely the easiest option (it is right next to the trailhead). However, P3 is the most expensive to park at, and only has a limited number of spots.
P3 is best for those that are coming in a group, as with a group it lowers the cost overall, and you won't need to worry about taking the shuttle. The shuttle is a per/person charge, and can really add up if you are multiple people. (Don't worry we will explain this more next).
The price for parking at p3 is 900 NOK for one night, and this is only until midnight. If you are planning on camping, you will actually have to pay for two nights. (It isn't 900 for the second night, but it is still several hundred - we unfortunately didn't get these exact details).
The price is per car, not per person. There are only 30 spots in this lot, so it is crucial that you book in advance.
Parking at P2
Parking 2 is where the majority of people park, as it is much cheaper than p3. There are 180 sp0ts, and it comes on a first come, first serve basis. The price is 500 NOK for one day, and 200 NOK for the second day. As we camped, we ended up paying 700 NOK for our car to be parked in P2.
At P2 you then have the choice of walking to P3 (where the trail starts), or taking the shuttle to P3. The shuttle is 150 NOK per person to go up, and 100 NOK to come down. The shuttle runs from 6:30 am to 6:45 pm. Below you can see the full schedule of when the shuttle runs both up and down.

If you get there outside operating hours, or want to save a little bit of money, then you can walk up the paved road, which is 4km, and takes between an hour to an hour and a half extra.

The walk between P2 and P3 is 4 km along a paved road.
Parking at P1
P1 is located at Tyssedal, which is 5 1/2 km up the road from P2, and is the first one you'll pass coming from Odda.
One day of parking in P1 is 300 NOK, 2 days is 500 NOK, and 2 days is 700 NOK in total. From P1 you can take a shuttle that comes from Odda (stopping at P1 to go to P2) for 100 NOK, or walk the 5 1/2 km extra (which we definitely do not recommend).
Parking in Odda
If you plan on spending the night in Odda, are taking public transportation, or are alone and want to save some money, then this would be a potential option. There are buses that go from Odda to P2 for 200 NOK one way, or 350 NOK roundtrip, and then you could choose to hike from P2 to P3, or to pay for the second shuttle.
Below you can see the timetable for the shuttle that goes from Odda to Trolltunga:

There is also the option to use Odda Taxi, which is 700 NOK each way. This option would be idea if you either have a group, or if you would like to set up a time outside what the bus offers.
The final option (which we would NOT recommend, is to hike the entire way from Odda to the trailhead.
This would tack on an extra 16 km to the trip, so would really only be something we would see someone doing if they are on a very tight budget. (In total you would end up walking 26 km each way). Alternatively, you could try to hitchhike from Odda to P2, but we aren't sure how common this is really.
Hiking Trolltunga
Alright, now that you have successfully made your way to the start of the trailhead, let's talk about the most important part- the hike itself!
Don't have time to read the whole article and want to save it for later? Just pin it!


⏳ How Long Does it Take to Walk Up Trolltunga?
From the start of the trailhead to the famous Troll's tongue formation is 10 km in total. The time it takes hiking Trolltunga varies greatly from person to person, but we are going to share what the information boards say, as well as how long it took us to complete.
The website and info centers suggest that hiking Trolltunga takes between 8 and 12 hours. Luckily, if you are in decent shape like us, it won't take you anywhere near that!
We were honestly dreading this hike, because we expected to be hiking much longer than we ended up hiking. It took us 3 hours and 20 minutes to get up, and 2 hours and 40 minutes to get down. We took breaks for eating and dunking our heads in the water, so truthfully it did take us longer than 6 hours.

🥾 Hiking Trolltunga: What to Expect
Coming from the Lofoten Islands, we got pretty used to the short and steep hikes up there. However, the hikes in the south of Norway are much longer, but not nearly as steep.
The beginning of the hike started off a little steep, and had a series of small bridges, stairs, and large rocks you'll be climbing. The first 45 minutes of the hike were the worst for us. But don't worry- it does get better!


The beginning of the hike starts out with a lot of stones, bridges, and steep areas.
After the massive uphill stone area, you'll find natural pools, and things will start to level out a bit. You'll continue through different areas where you'll need to hop along rocks along streams, as well as walking through areas of snow (depending on when exactly you are visiting).
We were there in mid-June, and we still had areas where we needed to walk through the snow. Make sure to walk carefully, as these areas can be quite slippery.


There can be a lot of snow while hiking Trolltunga if you are early in the season.
Once you reach the shelter (cabin) shown below, you are almost there! You'll have just 5-10 minutes left of hiking Trolltunga!

Right before arriving at Trolltunga you will find a shelter cabin.
🖼 Hiking Trolltunga: The Views and the Pictures
You know how they say it's about the journey not the destination? Well, sorry to say but that certainly isn't the case for hiking Trolltunga.
We found the hike to be quite boring in parts, and we couldn't wait to just get to the end! But the view is honestly worth all of the hours and money put in, and getting the perfect picture is certainly going to be your ultimate souvenir from hiking Trolltunga.
We arrived at the top around 10:00 pm, and there were just a few other people at the top. This made it seamless for getting the content we wanted, as we could play with different angles, take videos on our phones, and use our drone. If you plan on visiting during the day, a task like this will certainly be a little challenging.


Camera shot vs drone shot at Trolltunga
🤳🏻 The Line to Take a Picture at Trolltunga
Unless you plan on getting to the top of Trolltunga extremely early or super late, chances are you will have a line.
We have heard of people spending a full 1-2 hours just waiting to get their shot! Honestly, we feel like it takes away a bit from the magic, and certainly makes it a bit more stressful if you're looking for the perfect picture.

If you visit during the day, you will start to see crowds and long lines for taking pictures.
📸 How to Take the Perfect Picture at Trolltunga
There are a number of angles that you can play with while capturing Trolltunga. The most common one that you will see is from the side of the mountain, which is right across from the rock itself. It feels completely safe to stand there. and we simply set our tripod up and kept it on interval so that it could keep shooting. You could also ask one of the other many people around, but you won't be guaranteed a great shot.
Another fun angle is to actually take a photo from a bit lower down. You can achieve this by climbing down the rocks at the corner where most people take their pictures. If you see the photo below, this is similar to the shot you can get. However, we were a bit scared of the climb, as it looked extremely risky, so we opted to fly our drone over to the same area instead.
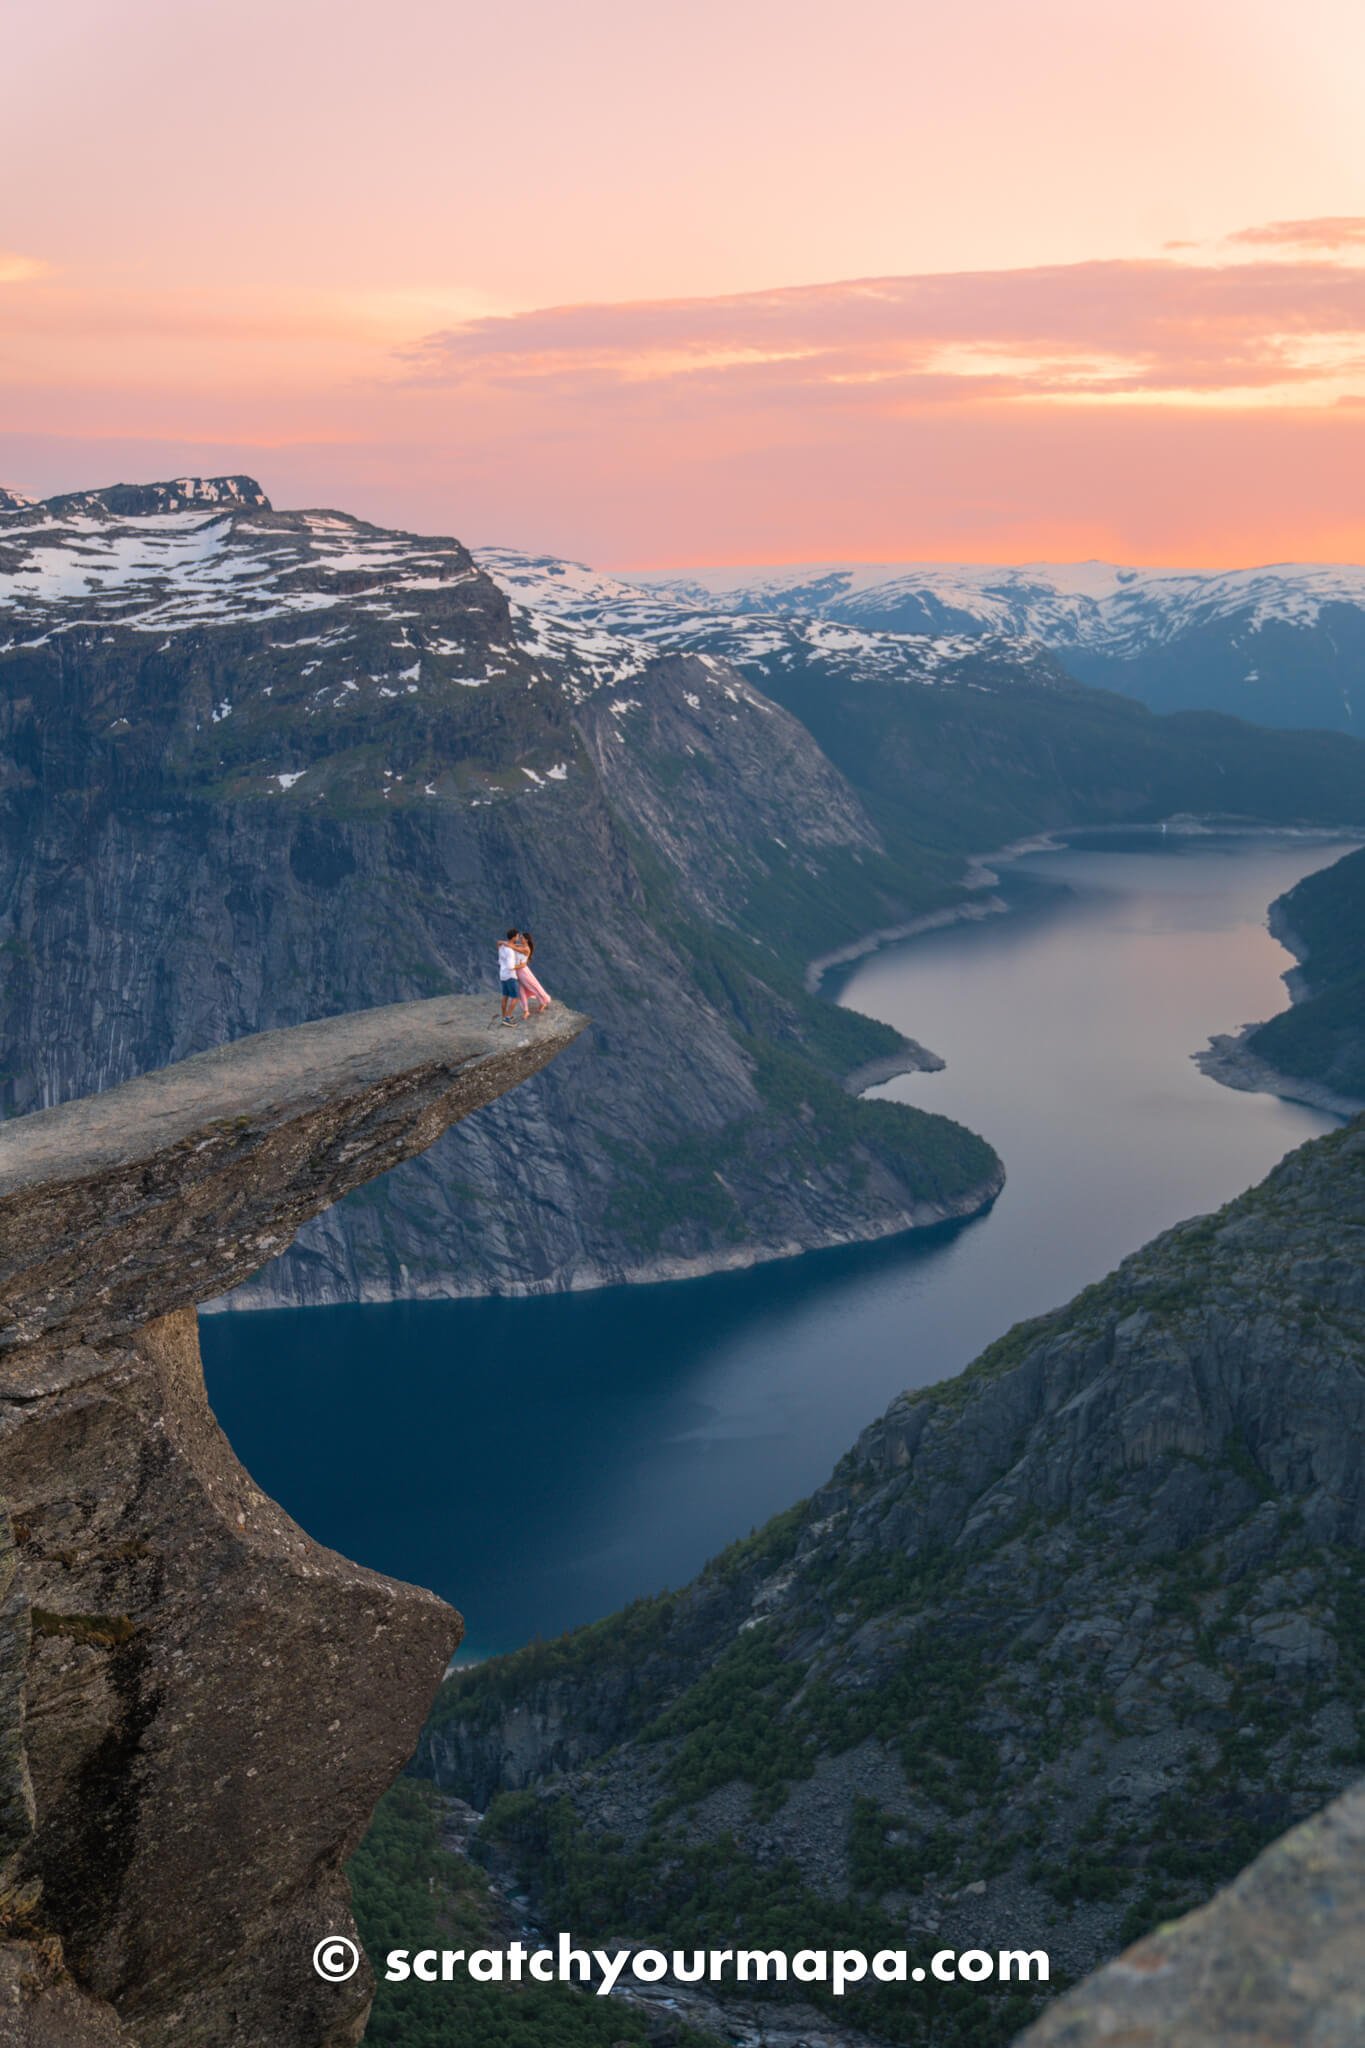
When it comes to lighting, sunset is the most ideal time to take a photo, as you can see it setting across the fjord. We just missed the sunset when we got to the top, as it went behind the mountain just before we got there (probably 30-60 minutes before the actual time of the sunset). The coloring would also be stunning during sunrise, but opted to take our photos the night before.

Our favorite time to shoot at Trolltunga was during sunset.
🚶🏻♀️ Hiking Back from Trolltunga
As soon as we were leaving Trolltunga, we started to see more and more people finishing their hike. We walked the first hour, until we reached the picnic benches on the side of the trail. This was where we stopped to have a sandwich, and enjoy the views.

On the way back there are picnic tables you can stop at.
Right after, we noticed that there was a large grassy area below with a picnic table overlooking the gorge, as well as a giant waterfall going right into the gorge! People were relaxing in the grass, and cooling off in the stream leading to the waterfall, making this a great stop along the trail.


Make sure to stop and enjoy the views of the gorge!
We walked another hour until we reached big pools where a few people were hanging out, and we decided to take a dip (it was extremely hot at this point in the middle of the day).
The final 40 minutes of the hike were very steep and slippery from the dirt, so just remember to watch your feet, and not go too fast, as it can be pretty harsh on your knees.

There are a bunch of natural pools at Trolltunga where you can cool off in.
🏁 Getting from the Start of the Trail Back to P2
As soon as we were arriving to the start of the trail, we realized that the shuttles were not running (they take a few hour lunch break and don't run for a couple of hours).
We didn't want to wait, and as it is a downhill walk along the road, we decided to skip paying the 100 NOK each for the shuttle, and walked the 4 km. The walk was super easy, and took about 40 minutes to complete.

Remember to keep the lunch break in mind!
⌛️ Breakdown of Time Spent at Trolltunga
6:00 pm - 6:45 pm parked, used the bathroom, got info, and paid for parking
6:45 pm - 6:50 pm took the shuttle to P2 and started the hike
6:50 pm - 10:30 pm hiking Trolltunga (2 breaks of 10 minutes - 3 hours and 20 minutes hiking)
10:30 pm - 11:30 pm took photos and enjoyed the views
11:30 pm - midnight had dinner and set up the tent
midnight - 8 am slept
8:00 am - 9:00 am had breakfast and packed up
9:00 am - 9:30 am took a few more photos
9:30 am - 10:30 am hiked to the picnic benches
10:30 am - 11:30 am had lunch and went down to see the waterfall
11:30 am - 12:50 pm hiked the rest of the trail
12:50 pm - 1:30 pm walked from the start of the trail to P2
1:30 pm - 2:00 pm chatted with people, used the bathroom, and packed the car
Time hiking Trolltunga: 6 hours
Total time at Trolltunga: 20 hours

All Your Travels
in One Book
Transform your travel memories into a unique book, with personalized pages, country by country.
Amenities at Trolltunga
As hiking Trolltunga is no small feat, it's important to know the amenities around!
🚽 What Amenities Can You Find at Trolltunga?
Unfortunately, there are no toilets, water fountains, trash cans, or kiosks along the trail, so it's important to be fully prepared before you start hiking Trolltunga.
P2 is where you can find toilets, a cafe, and souvenir shop, if you'd like to get hiking sticks, water, snacks, or any other gear that you may have forgot.
If you need to go to the bathroom along the trail, you'll have to hide, dig a hole, and take any toilet paper with you along the way, which means it's not too pleasant if you have your period or need to go number 2.

P2 is where you can find a shop, info center, and cafe before hiking Trolltunga.
💧 Can You Drink Water From Trolltunga?
Along the trail you'll actually find several waterfalls, rivers, and streams. The water is perfectly safe to drink, so you can refill your water bottle along the way. We also brought a Steripen with us just as an extra precaution.


There are plenty of waterfalls that you can stop at to refill your water bottle.
⛺️ Can You Sleep at Trolltunga?
One thing we love about Norway is the law stating that anyone can wild camp around the country. This means you are legally allowed to camp at the top of Trolltunga, and along the trail.
Just keep in mind that there are a few areas where It is not allowed (probably because it hasn't been deemed safe), so if you plan on camping along the trail, just make sure you aren't staying in one of the forbidden areas.

If you want to camp along the trail, look for these signs.
We found around 10-15 other tents on the top of Trolltunga, and a lot of people had even carried equipment to cook! We honestly wouldn't recommend that as it's a bit of a pain to carry all the stuff up.
We were tired enough just bringing our tent, sleeping bag, and food. Keep in mind that any trash you may have you will need to carry with you, as there are no trash bins anywhere on site.

You can camp at the top of Trolltunga, and in other designated areas along the trail.
Despite having to bring extra things to carry for staying the night, we truly loved camping up there, as it allowed us to have the place to ourselves for a bit, and to rest between hiking.

Will You Buy Us A Coffee? ☕
As coffee lovers, we always enjoy the energy of caffeine. It helps us get the best free travel guides out there for you! 😄
Trolltunga Price & Timetable
Now that you know what to expect while hiking Trolltunga, we're going to break down the prices and times so that you can visually plan a bit better for your adventure.
💵 Prices for Trolltunga
Prices can vary greatly depending on where you park, and how many people you are traveling with. We've created this full table for you so that you can have a better idea of how much you will send per person, depending on the size of your group, and the transportation that you decide on!
PRICING PER PERSON 1 DAY | Parking at P3 | Parking at P2 | Parking in P2 + Shuttle there | Parking in P2 + Shuttle Round Trip | Parking in P1 | Parking in P1 + Shuttle | Parking in P1 + Shuttle Roundtrip | Parking in Odda - Bus or Taxi Roundtrip |
|---|---|---|---|---|---|---|---|---|
1 Person | 900 NOK | 500 NOK | 650 NOK | 750 NOK | 300 NOK | 400 NOK | 500 NOK | 300-350 NOK |
2 People | 450 NOK | 250 NOK | 400 NOK | 500 NOK | 150 NOK | 250 NOK | 350 NOK | 300-350 NOK |
3 People | 300 NOK | 167 NOK | 217 NOK | 317 NOK | 100 NOK | 200 NOK | 300 NOK | 300-350 NOK |
4 People | 225 NOK | 125 NOK | 275 NOK | 375 NOK | 75 NOK | 175 NOK | 275 NOK | 300-350 NOK |
5 People | 180 NOK | 100 NOK | 250 NOK | 350 NOK | 60 NOK | 160 NOK | 260 NOK | 300-350 NOK |
🕘 Timetable for Trolltunga
The trail for hiking Trolltunga is open 24 hours a day, 7 days a week. The shuttles from P2 to P3 run from 6:30 am to 6:45 pm every half hour, with a break in the middle of the day. (You can see the exact time table below.)
The Odda Bus runs between June 23rd of September 17th. The route starts 6:40 AM from Trolltunga Camping, with 9 stops, and arrives at the Skjeggedal parking lot (P2) at 7:10 AM.

The return trip leaves the Skjeggedal parking lot at 5:30 PM and has the same stops on the way back. In addition, they have an extra route set up between May 29th and June 30th that leaves Trolltunga Camping at 10:00 AM, getting to Skjeggedal at 10:30.
How To Travel Cheaper and Better in 15 minutes!
How much more would you travel, if it costed you less resources?
With our Free eBook, you will learn how to save money and time on your future trips. Plus, you'll see the exact system we use.
Grab your copy for free when you sign up for our newsletter 👇

Safety While Hiking Trolltunga
Hiking Trolltunga can definitely be intimidating. However, we're here to go over everything you need to ensure a safe hiking experience.
🥵 What Difficulty Level is Trolltunga?
Hiking Trolltunga is not super difficult, but it is long. The beginning of the hike is a bit steep, so don't try to rush it. If it has rained, it can also become a bit slippery in parts, so make sure to bring proper footwear, and watch your step at all times.
Another thing to keep in mind is the snow. When we went in mid-June, there was still quite a bit of snow, and we had to walk through several parts with very compact snow. While you won't sink in, it can be a bit icy, so make sure you are extra careful.

Keep in mind in many parts you will have to hike through the snow!
There are never any time where you will be walking along any cliffs or areas where you can fall greatly, so there is nothing to worry about there.
As far as being on the rock of Trolltunga itself, it is very wide and sturdy, making it easy for all types of people to feel comfortable taking a photo on top of it. Just make sure to be careful with the edge, and don't do anything crazy like jumping or performing stunts.
🧗🏻 Has Anyone Ever Fallen From Trolltunga?
There has only ever been one recorded death at Trolltunga, which was a 24-year old Australian woman in September of 2015. She was trying to get around the line of tourists and tripped and fell, falling off the side of the rock.
This is not to scare you (it really was a freak accident) but just to remind you that you need to be extra careful out in nature.
🚶🏻♀️ Can You Hike Trolltunga Without a Guide?
For those that don't feel comfortable doing the hike alone, there are guides are available to visit Trolltunga, which leave from the P2 parking lot. You can organize them in advance, or also sign up for them right on site.
That being said, you do not NEED a guide, as long as you are visiting during the season, which is from June to September.
Can you hike Trolltunga without a guide in May or any other month? The answer to that is no. If you want to visit Trolltunga in the off-season, you will in fact need a guide. This is because of the weather conditions, which would make hiking alone quite dangerous at that time. If you want to go it on your own, you will have to go hike Trolltunga in the summer.

Transform your photos
One click is all it takes to make your photos look stunning. Get our latest package of Lightroom presets, Into The Wild.
Other Things to Keep in Mind for Hiking Trolltunga
Now you know almost everything you need to know for hiking Trolltunga! Here are a few last things to keep in mind.
☀️ Weather Conditions at Trolltunga
Norway is much colder than other European countries, and can experience chilly temperatures even in the summer. We had really incredible weather when we were there (80 degrees Fahrenheit/ high 20's Celsius). It was super sunny and hot when we were hiking during the day, and cooled off at night. The top was a bit windy, and definitely significantly colder at night.
Our friends recently attempted to do Trolltunga (actually the day before posting this article) and they were not nearly as lucky with the weather. It was so foggy that they couldn't see, and they opted to turn around. We suggest giving yourself extra time in the area, so that if the weather isn't great you can try to go another day.
Keep in mind that Norway also experiences a lot of rain. While we were very lucky and had a week of sunshine, we heard that it's not so typical. We suggest bringing a poncho just in case, or monitoring the weather to choose a day that looks the sunniest.


If you want sunny weather and snow-capped mountains, June is a great month to visit Trolltunga.
📆 What Month is Trolltunga Best?
We hiked Trolltunga in mid-June and found that it could not have been more perfect! The weather was warm and sunny during the day, which made it ideal for hiking (and not unbearably hot). The night was windy and cool at the top, but definitely bearable.
We also found that as we went early in the season, there were much less tourists then if you were to go in July or August.
Another great month to visit Trolltunga would be September. All of the snow will have been melted from the summer temperatures, but it would be cooler to hike during this time, and most of the crowds will have been gone after their summer vacations.
🌅 What is the Best Time for Hiking Trolltunga?
If you are looking to avoid the crowds at Trolltunga, and want the best lighting, then we definitely suggest spending the night. We were so happy we did, as we experienced a magical sunset, and also got to enjoy the atmosphere in the morning before all of the tourists rolled in.
Keep in mind that the hike was harder for us, as we had no one hiking around us, and we had to carry our camping equipment. In addition, we had to pay for two days rather than one.
If you are not a photographer, and don't mind having harsh lighting or lining up for a photo, then we would suggest just starting your hike as early in the morning as you can. If you are set on having the best lighting, but don't want to camp, you can start extra early (think midnight), to get there for a stunning sunrise.

Hiking in the afternoon is great for the lighting, and to avoid the crowds.
Alternatively, you can hike late in the afternoon, and come back after the sun sets, as they don't check parking that late. The two things to keep into consideration here though, are that you would be hiking in the dark for a bit, and you would have to tack on the 4 km from P3 to P2, as the shuttles would not be running at that time.
🎒 How Do You Prepare for Trolltunga?
In order to be ready for hiking Trolltunga, you need to prepare yourself well. Here are some of the things to bring for your hike, whether it's for a day hike, or for camping overnight.
Packing List for Hiking Trolltunga
- Hiking boots or good sneakers
- Hiking Poles (if there is a lot of snow of if you have bad knees - you can buy these at P2)
- Sunscreen (there isn't any shade along the trail)
- Reusable water bottle (we use Cafago insulated water bottles because they hold the temperature)
- Steripen (this allows you to sterilize the water from the waterfalls)
- Bathing suit (if you hike during the day and want to take a dip in one of the natural pools)
- Power Bank (we use Anker power banks, as they are super long lasting)
- Backpack (take a look at these backpacks for travelers!)
- Snacks like sandwiches, trail mix, and protein bars
- Poncho (in case there is rain in the forecast)
- Light sweater or jacket (if you go very early or late for the top)
📸 Photography Packing List
- Camera (we use the Sony A7Riii)
- Tripod for your camera or phone (We use the Rangepod Tripod)
- Drone (We use the Mavic Mini 4 Pro because it's super light and resist the wind well)
- Versatile standard lens (you won't need a telephoto or super wide lens here) We use the Sony GM 24-70
- ND filters (if you go when it's very sunny out)
🏕 Extra Packing List for Camping at Trolltunga
- Tent
- Sleeping bag
- Small pillow
- Food for 2 meals
- Small cooler (if you bring perishable foods)
- Flashlight (you'll need the battery on your phone)
- Eye Mask (there are only a couple hours of darkness)

Looking To Travel Somewhere?
Off The Beaten Trips is our travel agency.
But this isn't anything like you've ever experienced before. You'll have an epic trip without having to break the piggy bank.
Unique locations. Epic adventures. Lifetime memories.
Tips for Hiking Trolltunga
- Bring plenty of water and snacks.
- Watch your step and follow the poles at all times.
- Give yourself extra time, as it is common to stop.
- Plan your visit ahead of time, and have a plan B.

Stay Up To Date📫
We have a non-spammy weekly newsletter, where we give travel tips, and exclusive content and discounts.
Travel Planning Tools
Here are some useful tools that you can use for planning your upcoming trip!
So are you ready to embark on the epic experience of hiking Trolltunga? We know it may seem overwhelming, but it is certainly worth the time and money! If you have any concerns, feel free to reach out to us on Instagram.
Want to see more epic spots around the country? We have a ton of other Norway guides coming up each week! Make sure to subscribe to our newsletter so that you can stay in the know, as well as receive exclusive content, and discounts on our shop.
Looking to plan an incredible trip to Norway? Now you don't have to do all of the work. Scratch Your Mapa offers travel planning services, where we guarantee to save you both time and money, and we can even provide you with a personalized itinerary! Simply shoot us an email, and we'd be happy to help you get started.

Here are some other articles you'll love:
Like this article? Please share it with your family and friends, so that we can continue to keep creating free travel guides for you! It takes just a second, and would mean the world to us. Thanks for being here!